Subscribe on YouTube
New tutorial videos every week. Real craft business tips, feature walkthroughs, and Q&A from your comments.
Step-by-step walkthroughs of every feature. New videos added weekly.
New to ProfitTrackStar? Start here.
The Pricing Calculator is the heart of ProfitTrackStar. It's a tool that helps you figure out exactly what to charge for each product you make so that you actually make a profit — not just break even.
You enter your raw material costs (wood, filament, hardware, etc.), how long it takes you to make the item, your hourly labor rate, and any overhead costs (electricity, tools, booth fees). The calculator adds everything up to show your true cost, then calculates a suggested selling price based on your target profit margin.
It also factors in credit card processing fees (Square, Stripe, PayPal, etc.) and sales tax — so you see your actual take-home profit for every possible selling scenario. No more guessing if you're charging enough.
You enter your materials (selected from your library), labor time (hours and minutes), hourly rate, and overhead percentage. ProfitTrackStar calculates your total cost and then suggests a selling price based on your target margin.
The full pricing matrix (Pro) shows every combination of credit card processor and sales tax rate so you can see your exact net profit in every scenario.
Go to Settings → CC Processor Rates and enter your processor's rate (e.g., Square is 2.6% + $0.10). When you create a product, you can select your processor and the calculator will show your net profit after fees.
On the pricing matrix, you'll see a column for each processor you've set up so you can compare scenarios side by side.
Margin is profit as a percentage of the selling price. A 60% margin on a $25 item means $15 profit.
Markup is profit as a percentage of the cost. A 150% markup on a $10 cost item means you sell it for $25.
Most craft pricing guides use margin. ProfitTrackStar supports both — use whichever you prefer.
Go to Settings → Sales Tax Rate and enter your local rate (e.g., 7%). The pricing calculator will then show you price options with tax baked in vs. added on top, so you can decide how to present your prices.
Note: ProfitTrackStar helps you track and estimate sales tax but is not a substitute for proper tax accounting. Consult your accountant for tax filing requirements.
The Orders tab is your custom order management system. Any time a customer asks you to make something specific for them — a personalized sign, a custom shelf size, a specific color filament print — that's a custom order and this is where you track it.
For each order you record the customer's name and contact info, exactly what they want and at what price, whether they paid a deposit, how they're paying (cash, card, Venmo, etc.), and how they'll receive it (pickup, delivery, shipping, or at an event). You then move the order through statuses: Pending → Making → Ready → Delivered.
The Dashboard shows you all your active orders at a glance so nothing falls through the cracks. When an order is marked Delivered and paid, it automatically logs to your Transaction History. You can also generate a PDF invoice from any order with one click.
When creating or editing an order, set the Payment Status to "Partial / Deposit." A deposit field will appear where you can enter the amount paid upfront. The order will show the remaining balance due.
On any order card, click the 🖨️ Invoice button. This opens your browser's print dialog — choose "Save as PDF" to download it, then email the PDF to your customer. Make sure your business info is filled in under Settings → Business Profile so it appears on the invoice.
- Pending — Order received, not started
- Making — Actively in production
- Ready — Finished, waiting for pickup or shipment
- Delivered — Completed and handed off to customer
- Cancelled — Order cancelled
Use the ▶️ Advance button to move an order to the next status, or edit the order to set it directly.
The Inventory tab tracks how many finished products you have ready to sell. For example, if you made 10 cedar shelves last weekend, you'd enter 10 as your on-hand count for that product. As you sell them, the count goes down automatically.
Each product can have a "low stock alert" threshold — when your count drops to or below that number, a red alert appears on your Dashboard so you know to make more before your next market.
There are actually two types of stock tracking in ProfitTrackStar: the Inventory tab tracks finished goods (completed products ready to sell), and the Materials tab tracks your raw materials on hand (boards, spools, bags of hardware). Both feed into the Batch Manufacturing system.
For finished products: go to Inventory tab, select a product, and set a "Low Stock Alert" threshold (e.g., 2). When your qty drops to or below that number, a red alert panel appears on the Dashboard.
For raw materials: go to Materials tab, click 📦 Update on any material card, and set both the on-hand qty and the alert threshold. Low materials also show in the Dashboard alert panel.
Inventory tab tracks your finished goods — how many completed products you have ready to sell (e.g., 8 cedar shelves ready).
Material stock (in the Materials tab via the 📦 Update button) tracks your raw materials — how many boards, spools of filament, bags of hardware you have on hand.
When you run a batch in Batch Manufacturing, it deducts from raw material stock and adds to finished goods inventory.
Batch Manufacturing is a production planning tool for when you make multiple units of the same product in one sitting. Instead of tracking materials manually, you define a "recipe" for each product — a list of exactly what materials it takes to make one unit — and then run a batch to produce multiple units at once.
For example: your Cedar Shelf recipe might be 2 cedar boards + 8 screws + 15 minutes of finishing. When you run a batch of 10 shelves, ProfitTrackStar automatically deducts 20 boards and 80 screws from your raw materials stock, and adds 10 shelves to your finished goods inventory.
It also warns you before you start if you don't have enough materials on hand, so you can reorder first. This is especially useful for craft fair prep — you can see exactly what you can make with what you currently have before you start cutting wood or pulling filament.
Go to Batch Manufacturing → Recipes → New Recipe. Select the finished product, and if that product has materials saved under it, the ingredients will auto-load. You can also add ingredients manually.
Each ingredient needs a material from your library, a quantity per unit, and an optional unit label (e.g., "boards," "ml," "grams").
The batch preview will show a red ⚠️ shortage warning for any material where your on-hand qty is less than what the batch needs. You'll be asked to confirm before running anyway.
You can still run the batch with a shortage — the app will deduct what it can (down to 0) and log the batch. Update your material stock when you restock.
The Events tab is for tracking craft fairs, farmer's markets, pop-up shops, holiday markets, and any other in-person selling event. For each event you log the name, date, venue, booth fee you paid, and expected attendance.
When you record sales or orders during or after an event, you can link them to that event. This lets you see — after the fact — exactly how much revenue and profit each event generated, minus what you paid for the booth. So instead of guessing "was that Christmas market worth the $75 booth fee and 6-hour drive?", you'll know for certain.
Over time the Events analytics help you decide which markets to return to, which aren't worth your time, and which months have the most profitable events in your area.
First, create the event under the Events tab (name, date, venue, booth fee). Then when you record an order or use Quick Sell, you can link the sale to that event. After the event, you can see total revenue, profit, and number of orders per event in the Analytics tab.
Go to Analytics → Events Performance. You'll see revenue and profit per event alongside the booth fee you paid. The analytics will show your true profit after booth costs, helping you decide which markets to return to.
The Import / Export tab is your data management hub. It has three main purposes:
Export (Backup): Save a copy of all your ProfitTrackStar data to a file on your computer or phone. You can export everything at once (full backup) or just specific sections like products, orders, or suppliers. This is your safety net — if you ever switch devices or accidentally clear your browser data, you can restore everything from a backup file.
Import (Restore): Load a previously exported backup file back into ProfitTrackStar. This is how you move your data to a new device or restore after data loss.
Platform Import: If you sell on Etsy or Shopify, you can export your orders from those platforms as a CSV file and import them directly into ProfitTrackStar. This saves you from manually re-entering every order. Duplicate orders (same order ID) are automatically skipped.
Go to Import / Export → Export → select "Full Data Backup (JSON)" → click Export. This downloads a file with all your data. Save it to Google Drive, Dropbox, or email it to yourself.
The app also auto-backs up daily to your browser storage, but file exports are the safest long-term backup. We recommend doing a file export at least once a week.
From Etsy: Shop Manager → Orders & Shipping → click the download icon to export CSV.
From Shopify: Orders → Export → All orders → CSV for Excel/Numbers.
Then go to ProfitTrackStar → Import/Export → Import → select the platform → upload your CSV file → click Import. Duplicate orders (same order ID) are automatically skipped.
The Dashboard is your home base — the first thing you see when you open ProfitTrackStar. It gives you a real-time snapshot of your entire business at a glance.
It shows your revenue and profit totals, your order pipeline (how many orders are Pending, Making, Ready, and Delivered), your top-selling products by profit, your monthly goal progress bar, and any low-stock alerts for products or materials running low. Think of it as your business's control panel — one screen that tells you everything important without having to dig through other tabs.
The Products tab is your product catalog — a library of everything you make and sell. Each product card shows the product name, your cost to make it, your selling price, and your profit margin at a glance.
Click any product to see its full details. From there you can edit it, see its pricing breakdown, or quickly sell it with the Quick Sell button (which records an instant sale without creating a full order). Your product catalog connects to everything else in the app — orders, inventory, batch manufacturing recipes, and analytics all reference your products.
The Materials tab is your raw materials library — a database of every ingredient that goes into your products. It's organized into five categories: Wood, Hardware, Filament, Metal, and Other (for anything else like paint, wax, fabric, resin, etc.).
For each material you record what it is, where you got it, how it's measured (per board, per gram, per bag), and what it costs. When you build a product in the New Product tab, you select materials from this library — which is how ProfitTrackStar calculates your true cost automatically instead of you having to add it up manually.
Each material card also has an On Hand section where you track how much of that material you currently have in stock. This feeds into the Batch Manufacturing system and triggers low-stock alerts on your Dashboard.
The New Product tab is your product builder — a step-by-step form for creating a new product in your catalog. You enter the product name, craft type, category, and then add materials from your library. You set your labor time (hours and minutes) and hourly rate, any overhead costs, and your target profit margin.
As you fill in the details, the pricing calculator updates in real time to show you your cost, suggested price, and what you'd actually take home after credit card fees and taxes. When you're happy with it, save the product and it appears in your Products tab ready to use.
The Suppliers tab is your vendor directory — a place to store information about every business or person you buy materials from. For each supplier you can save their name, contact person, phone number, email, website, what materials they supply, their typical lead time (how long it takes to get your order), and any notes like minimum order amounts or free shipping thresholds.
Once you've added a supplier, you can link individual materials in your library to that supplier. That way when you're looking at a material card, you can see at a glance where you bought it and click straight to the supplier's website to reorder.
The Analytics tab is your business reporting center. It turns all the data you've entered into charts and tables that help you understand how your business is actually performing.
It shows revenue and profit by month (so you can see your busiest seasons), your top products ranked by profit, sales broken down by channel (Etsy, in-person, custom orders), sales by payment method, and events performance (which craft fairs were most profitable). You can filter everything by date range and export tables as CSV files for your records or accountant.
The Transactions tab is your complete sales ledger — a chronological list of every sale you've made. Unlike the Orders tab (which tracks orders in progress), the Transactions tab is a historical record of completed sales.
Transactions are added automatically when you mark an order as paid and delivered, or when you use the Quick Sell button on a product card for instant cash sales. You can search and filter transactions by product name, date range, or sales channel, and see totals for filtered results. You can also delete individual entries if needed.
The Production tab is your production planning view. It looks at all your active orders and calculates exactly what you need to make to fulfill them. If you have 3 orders for cedar shelves and 2 orders for phone stands, it adds up the total production needed across all active orders and shows you a summary in one place.
This is especially useful before a craft fair — you can see at a glance "I need to make 8 more shelves and 5 more phone stands before Saturday" without having to manually add up each order.
The Tools tab contains a collection of miscellaneous utilities that don't fit neatly into other tabs. This includes the Price Tag & QR Code Generator (create printable price tags for your market table), the Bundle Builder (price a bundle of multiple products together), and a Pricing Reference tool (a quick lookup for pricing scenarios without building a full product).
COGS stands for Cost of Goods Sold — the total cost of all the materials and labor that went into everything you sold during the year. This is a key number for tax purposes and understanding your business profitability.
The COGS Report tab generates a year-end summary showing your total revenue, total COGS, gross profit, profit margin percentage, and estimated sales tax collected. It breaks this down by month and by product so you can see exactly where your money came from and where it went. You can print it or save it as a PDF to hand to your accountant at tax time. Note: this is a summary tool — always consult a qualified accountant for actual tax filings.
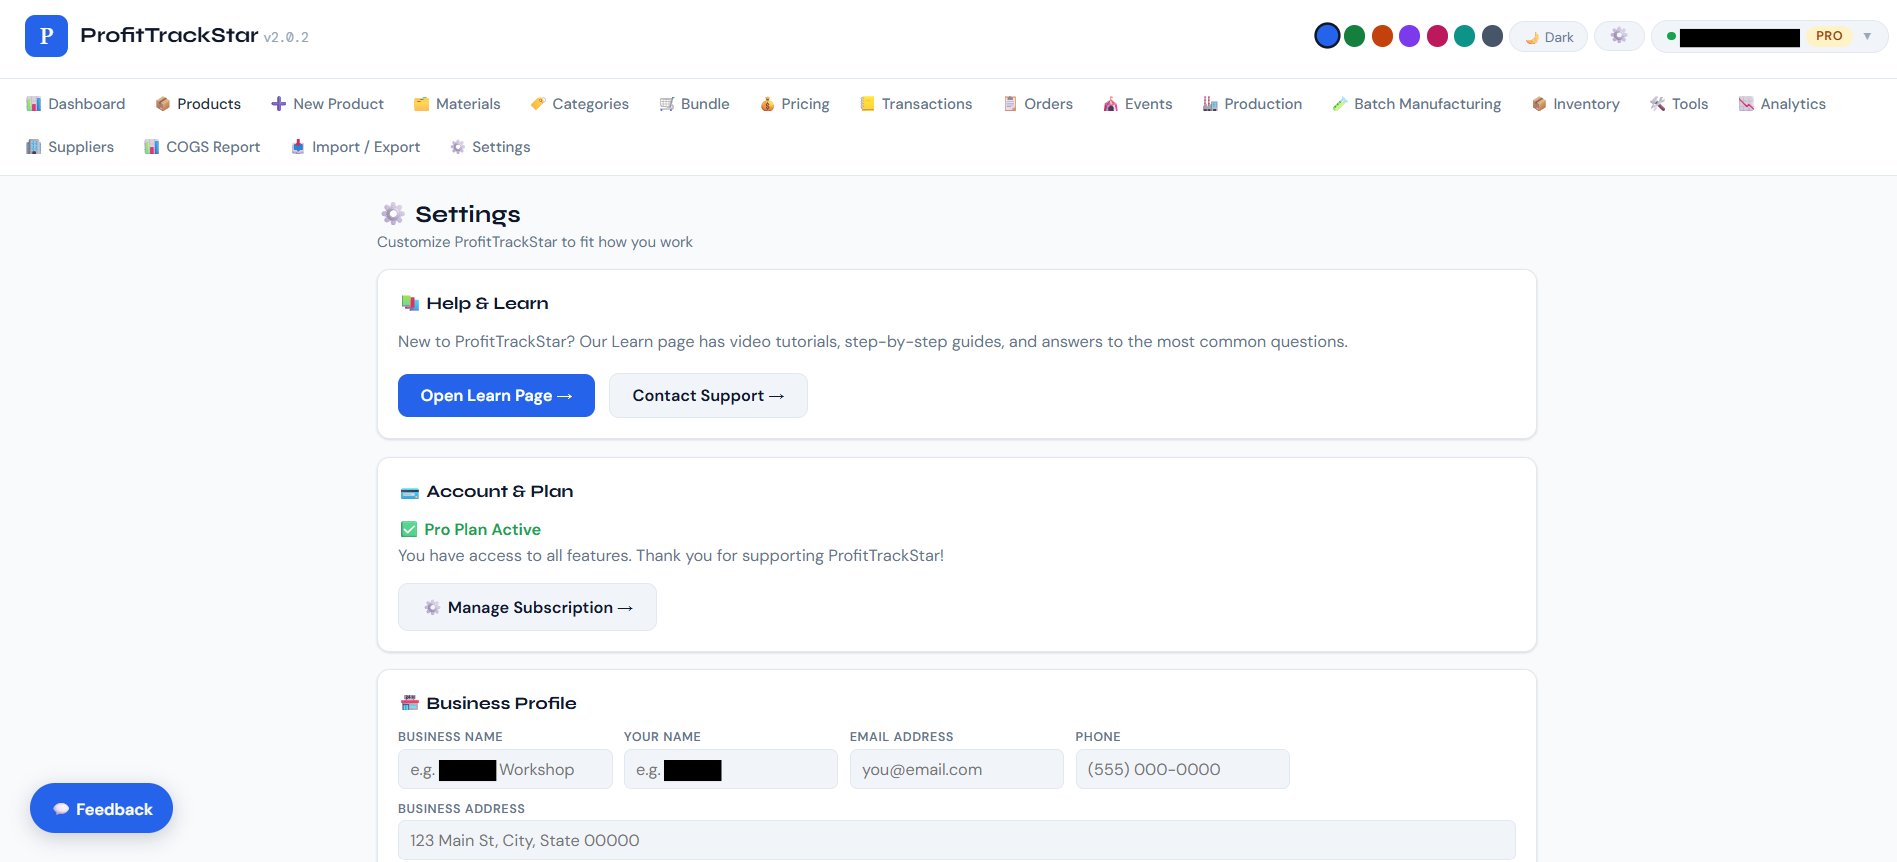
The Settings tab is where you configure ProfitTrackStar to match your specific business. Key settings include:
- Business Profile — your business name, tagline, address, and contact info (appears on invoices)
- Default Labor Rate — your hourly rate, used as the starting point in the pricing calculator
- Default Profit Margin — your target margin percentage, used as the starting point for new products
- Sales Tax Rate — your local sales tax percentage
- CC Processor Rates — your credit card processor fees (Square, Stripe, PayPal, etc.)
- Sales Channels — the platforms you sell on (Etsy, Shopify, in-person, etc.)
- Tab Order — rearrange the tabs in any order that makes sense for how you work
- Appearance — light or dark mode
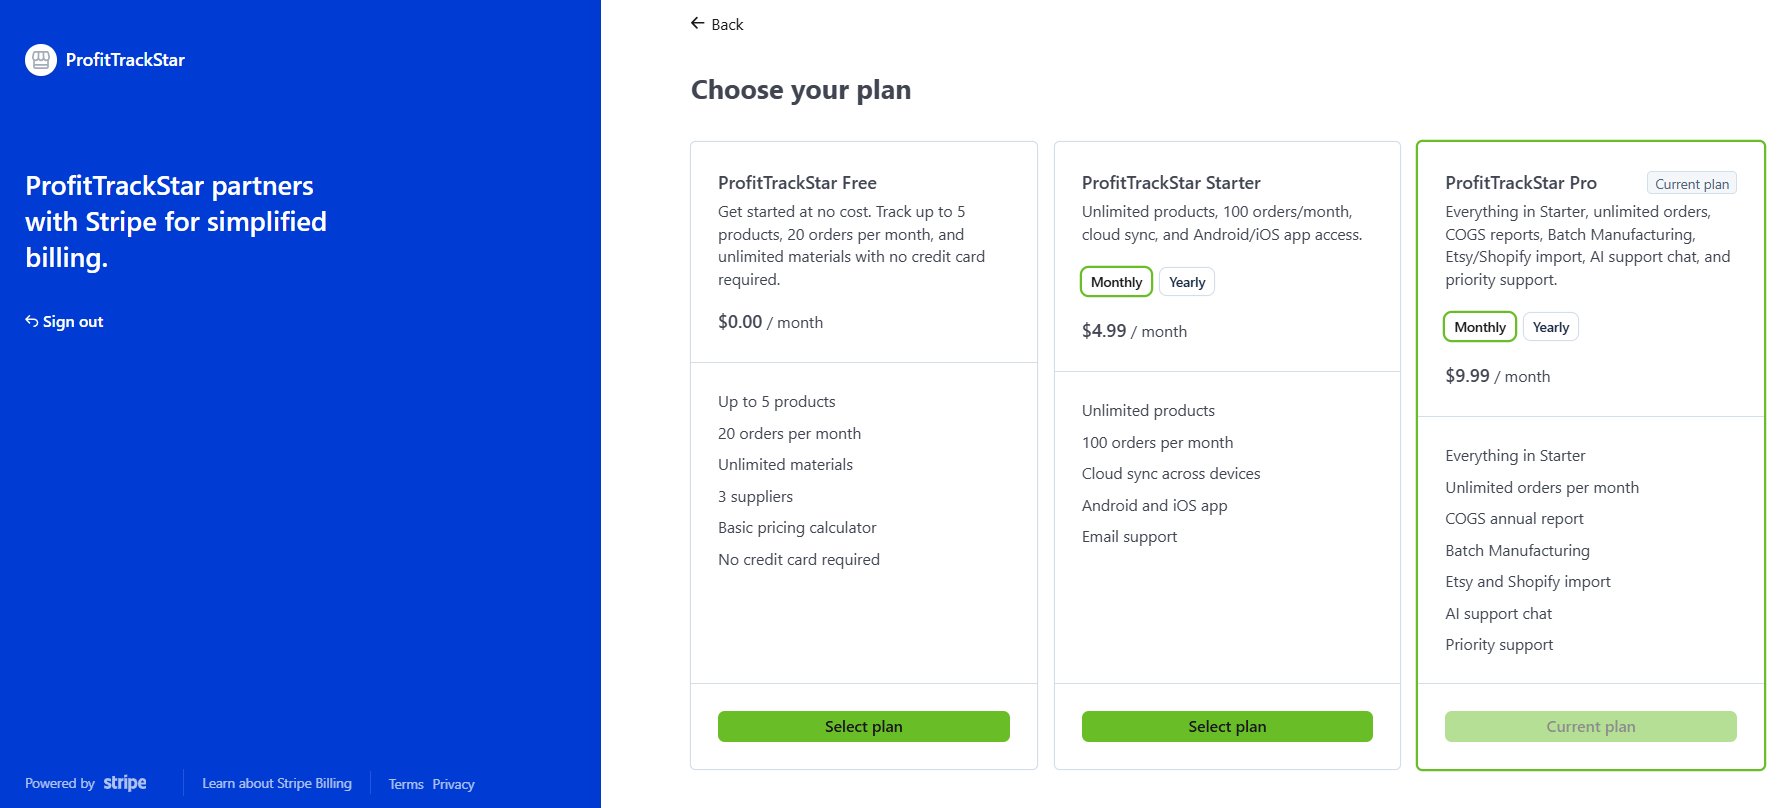
The free tier includes up to 5 products, 20 orders per month, and 3 suppliers. The materials library is unlimited on all plans. Upgrade to Starter ($4.99/mo) for unlimited products and up to 100 orders/month, or Pro ($9.99/mo) for everything with no limits.
Yes. Once the app is loaded, it works fully offline. You can record sales, create orders, and use all features at a craft fair with no WiFi. Changes sync automatically when you reconnect to the internet.
The Android app is coming soon and will be available on Google Play. In the meantime, ProfitTrackStar works great in your mobile browser — just open it on your phone like any website. An iOS app is planned for later.
Yes, cancel anytime with no penalty. You'll keep access to your paid plan through the end of your billing period, then your account reverts to the free tier. If you're not satisfied within the first 14 days, contact us for a full refund.
With a Pro or Starter account, your data syncs to the cloud automatically and is accessible on any device when you log in.
On the free tier, data is stored in your browser's localStorage. To move to a new device, go to Import/Export → Export a full backup → then import it on the new device.
Check this page first — the FAQ covers most common questions. If you can't find your answer, use our contact page. Pro users get priority response within 48 hours. You can also leave a comment on our YouTube channel — we answer every question and often make a video about it.
Absolutely — we build features based on what real users ask for. Send your suggestion via our contact page or drop it in a YouTube comment. If multiple users ask for the same thing, it goes on the roadmap.
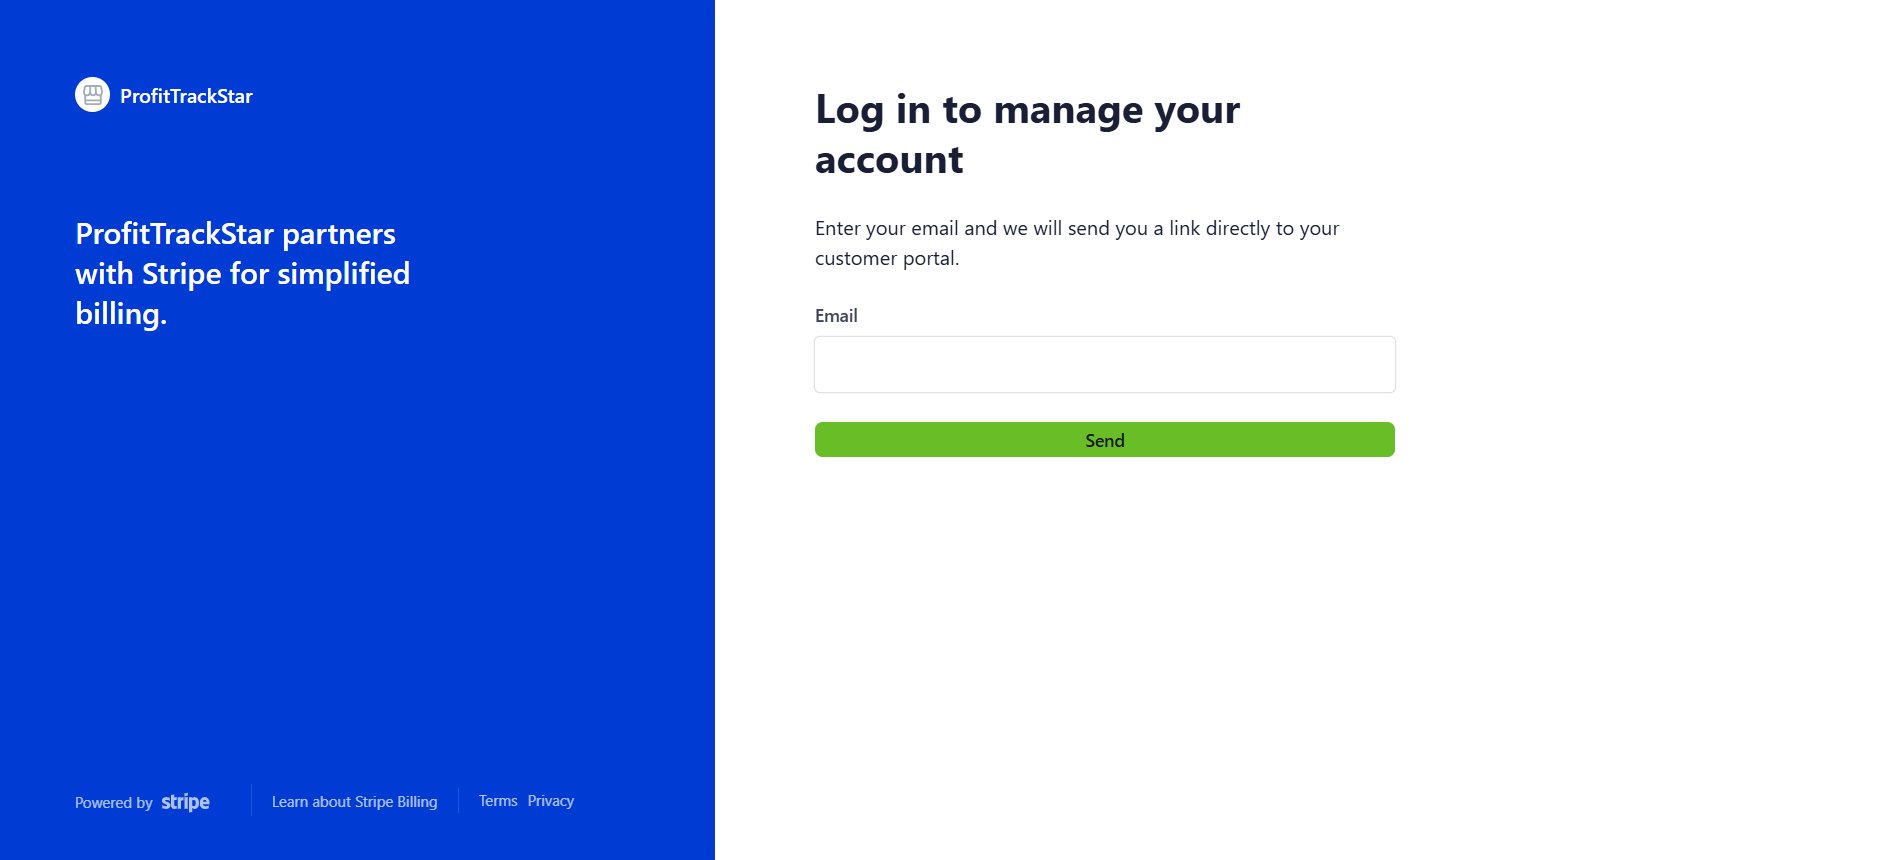
Go to the Settings tab in the app, scroll to Account & Plan, and click Manage Subscription →. This opens the Stripe Customer Portal where you can update your plan, change payment methods, and view invoices.
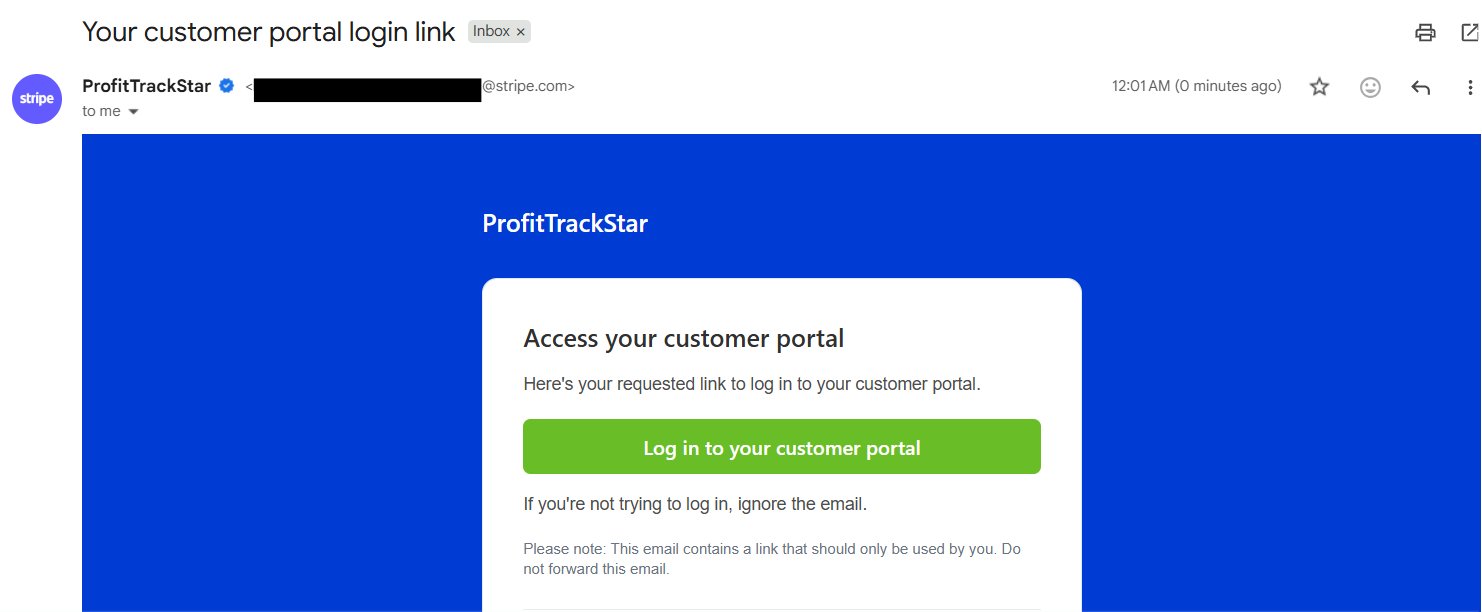
Click Manage Subscription and enter your ProfitTrackStar email on the Stripe login page. Click Send and check your inbox for a secure login link. Check spam if it doesn't arrive — the link expires after 30 minutes.
Once logged in you can see your Active Plan, Payment Method, Billing Information, and Invoice History. Click the Active Plan card to update or cancel your subscription.
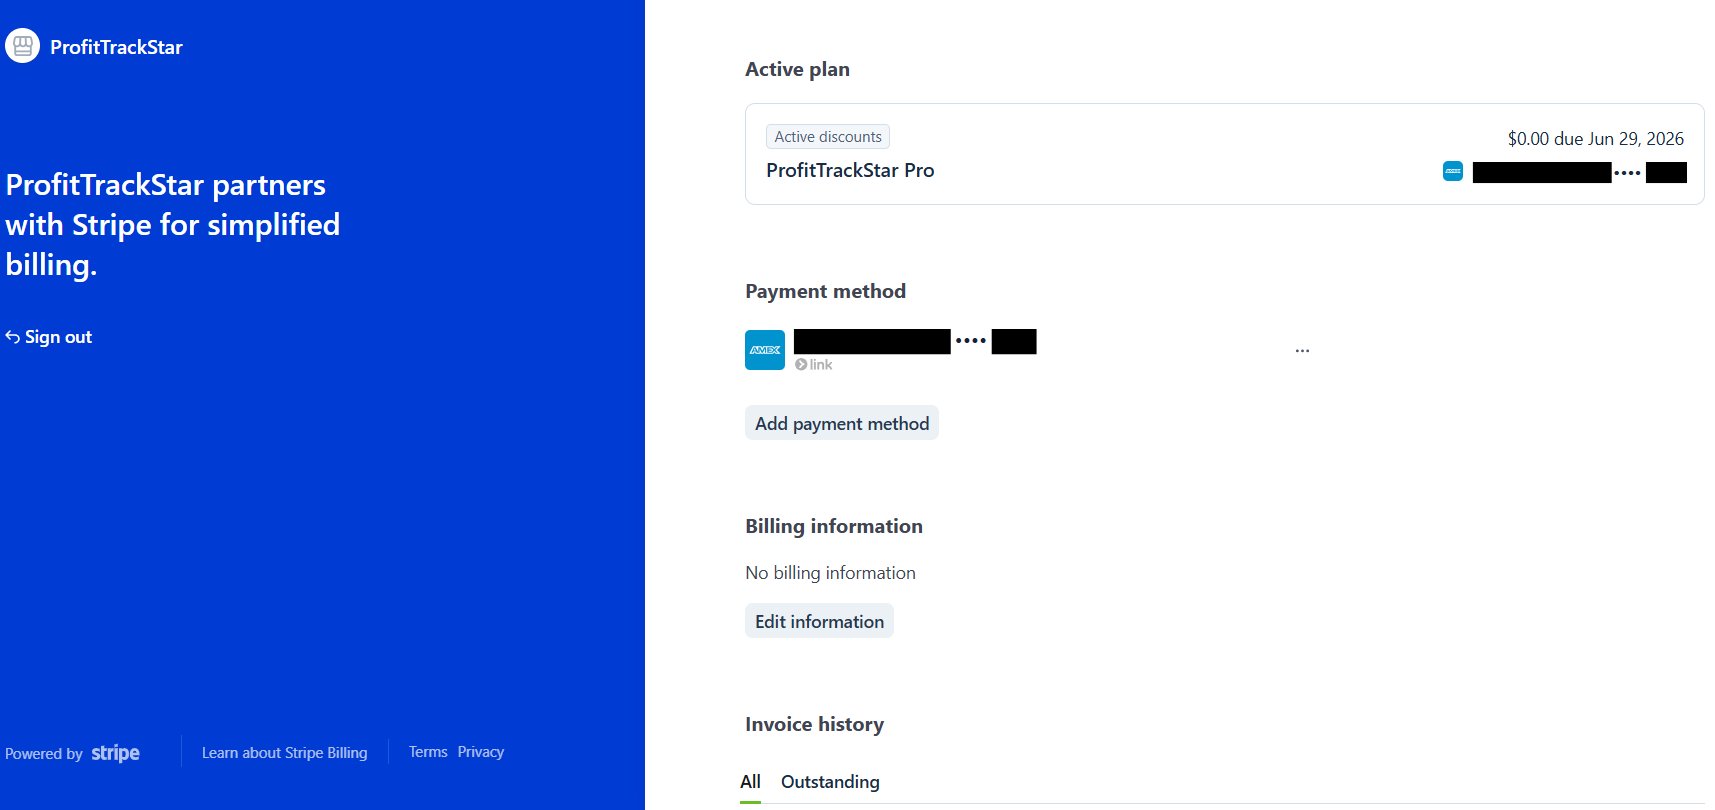
From the Active Plan page click Update plan. You will see all plans with a Monthly/Yearly toggle on each card. Your current plan is highlighted. Select a new plan and click Select plan to switch.
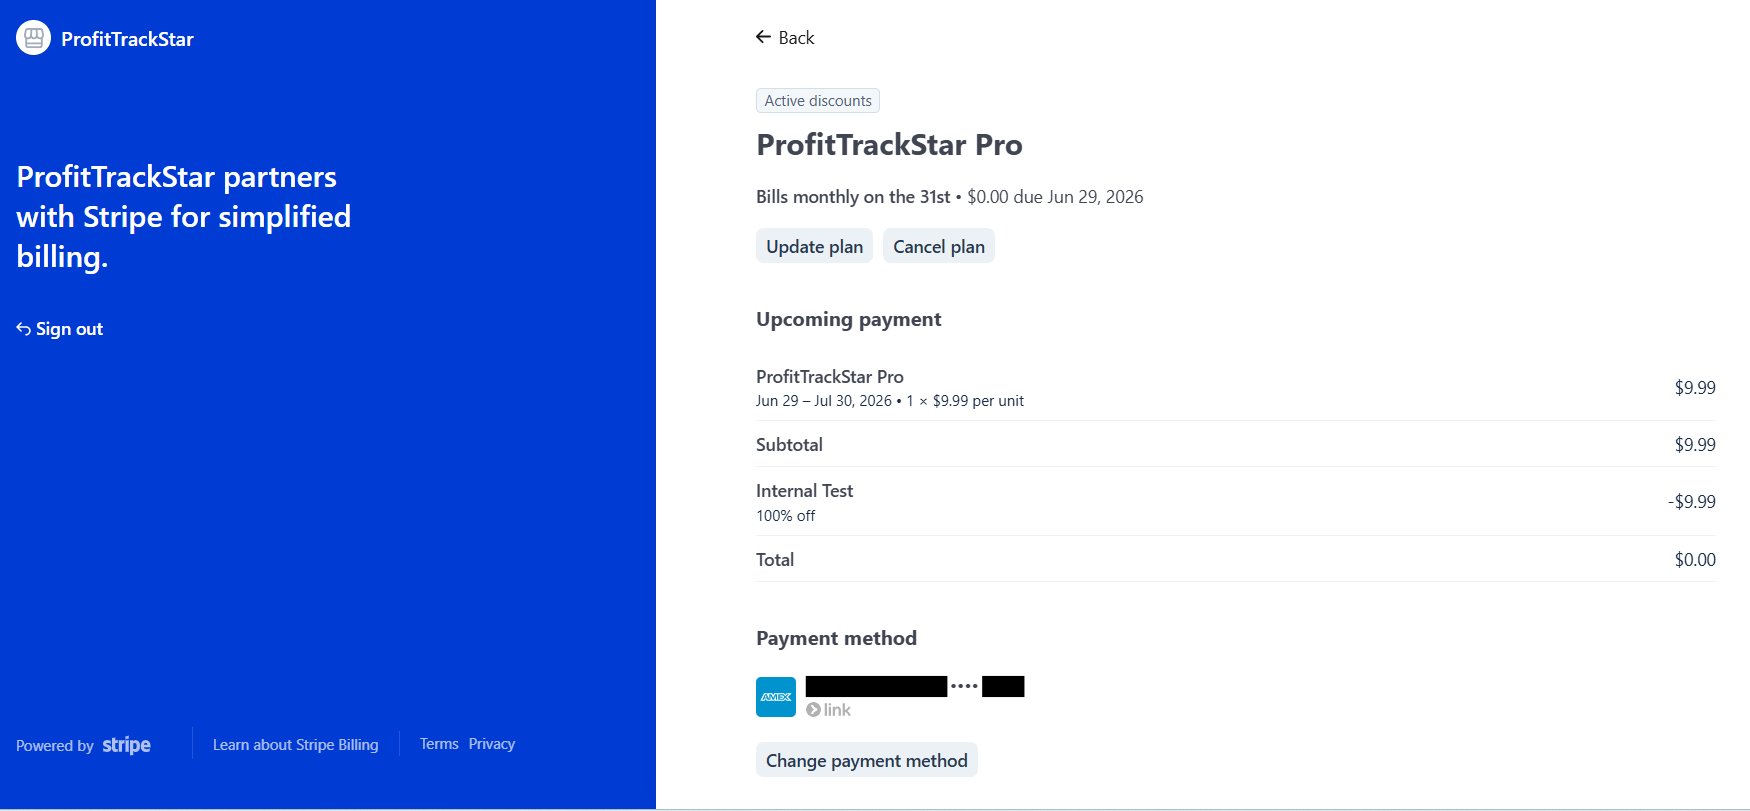
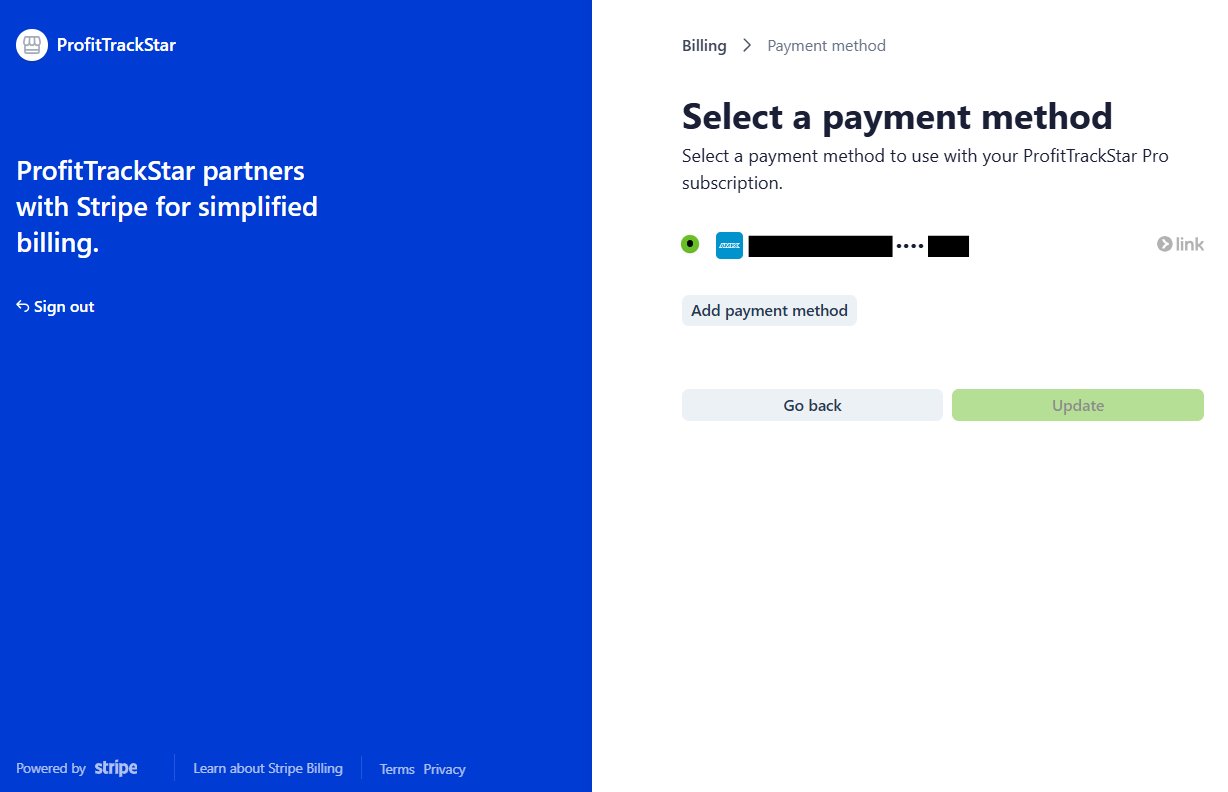
From the Active Plan page click Change payment method. Select an existing card or click Add payment method to add a new one, then click Update to save.
From the Active Plan page click Cancel plan. Choose Cancel at end of billing period to keep access until your paid period expires. Your data is never deleted when you cancel — you simply return to the free plan. Need help first? Contact us.
Stripe automatically retries failed payments up to 4 times over the next month and emails you to update your card. Your account stays active during retries. If all retries fail your account downgrades to the free plan — no data is lost, but paid features lock until billing is updated.
Still have a question?
Drop it in the YouTube comments, email us, or leave a question on the contact page. We answer everything.